> ## Documentation Index
> Fetch the complete documentation index at: https://support.quo.com/llms.txt
> Use this file to discover all available pages before exploring further.
# Clay
> Create contacts and send SMS messages from Clay using your Quo number to turn enriched leads into real conversations in seconds. We’ll show you how to set up the integration and what’s possible.
To use integrations, you must have the [Quo Desktop app installed](https://support.quo.com/getting-started/install-apps).
## Overview
The [Clay integration](https://www.clay.com/integrations/data-provider/quo) allows you to automatically create contacts in Quo and send personalized SMS messages from your Quo number using the [Quo API](https://support.quo.com/core-concepts/integrations/api).
This integration requires an active Quo subscription, prepaid API messaging credits, and **Owner or Admin** permissions in your workspace.
## How the integration works
Actions in Quo are triggered directly from **rows in your Clay table**.
### Available actions
Clay can automatically create contacts in Quo using data from a table row with:
* Name
* Phone number
* Email
* Company
Once created, the contact appears in your Quo workspace and future calls and messages are logged under that contact.
Clay can send outbound SMS messages from your selected Quo phone number.
* Messages are sent through the Quo API
* Conversations appear in your Quo inbox
* Replies return directly to Quo
* Dynamic variables from Clay can be used for personalization
***
## Data flow and limitations
### Action-based integration
* **One-way actions:** Data flows from Clay to Quo, so changes made in Quo will not automatically update in your Clay table.
* One API request is triggered per row
* Not a real-time sync
All automation logic and triggering rules for sending SMS messages or creating contacts are configured inside Clay.
***
## Messaging requirements
### US business texting registration
To send messages to US phone numbers:
* US carrier registration must be approved
* Messages won’t be delivered if registration is incomplete
Learn more about [Carrier Registration (A2P 10DLC) with Quo.](https://support.quo.com/getting-started/carrier-registration/carrier-registration)
### API messaging credits
Messages sent from Clay are treated as API messages and use prepaid API credits. If you **don’t have enough available API credits, your SMS messages will not be sent**.
Visit our [Pre-paid credits and usage-based billing](https://support.quo.com/core-concepts/administration/billing/credits-and-usage) article to learn how to add credits to your workspace.
***
## Who can access and set up the integration?
### Quo
You'll need an active Quo subscription, and be a workspace **Owner or Admin** to authenticate Quo inside Clay.
**To use the SMS action, you'll also need:**
* [Prepaid API messaging credits](https://support.quo.com/core-concepts/administration/billing/credits-and-usage#pre-paid-credits-and-usage-based-billing)
* Your completed [US carrier registration](https://support.quo.com/getting-started/carrier-registration/carrier-registration) (if messaging US numbers)
### Clay
An active Clay account on the Explore plan or higher is required to configure and trigger Quo actions.
***
## How to set up the Clay integration
The Clay integration uses Clay’s HTTP API enrichment feature to trigger actions in Quo directly from rows in your Clay table.
### 1. Get your Quo API key
You’ll need a Quo API key to authenticate requests from Clay.
1. Log in to Quo with owner or admin access
2. Go to **Settings → API**
3. Click **Generate API key**
4. Give it a name like "Clay"
5. Copy the key (you'll paste it during setup)
### 2. Create a Clay table
1. Open Clay
2. Create or open an existing Clay table
3. Add columns containing the data you want to send to Quo, such as: First name Last name Phone number Email Company SMS message text
Each row will represent a lead or contact.
### 3. Add the HTTP API enrichment
1. Click **Add enrichment**
2. Search for and select **HTTP API**
3. You'll see two tabs: **Generate (AI-assisted)** and **Configure (manual)**. You can use either method, but the examples below show manual configuration. [See more here](https://university.clay.com/docs/http-api-integration-overview#option-b-manual-configuration).
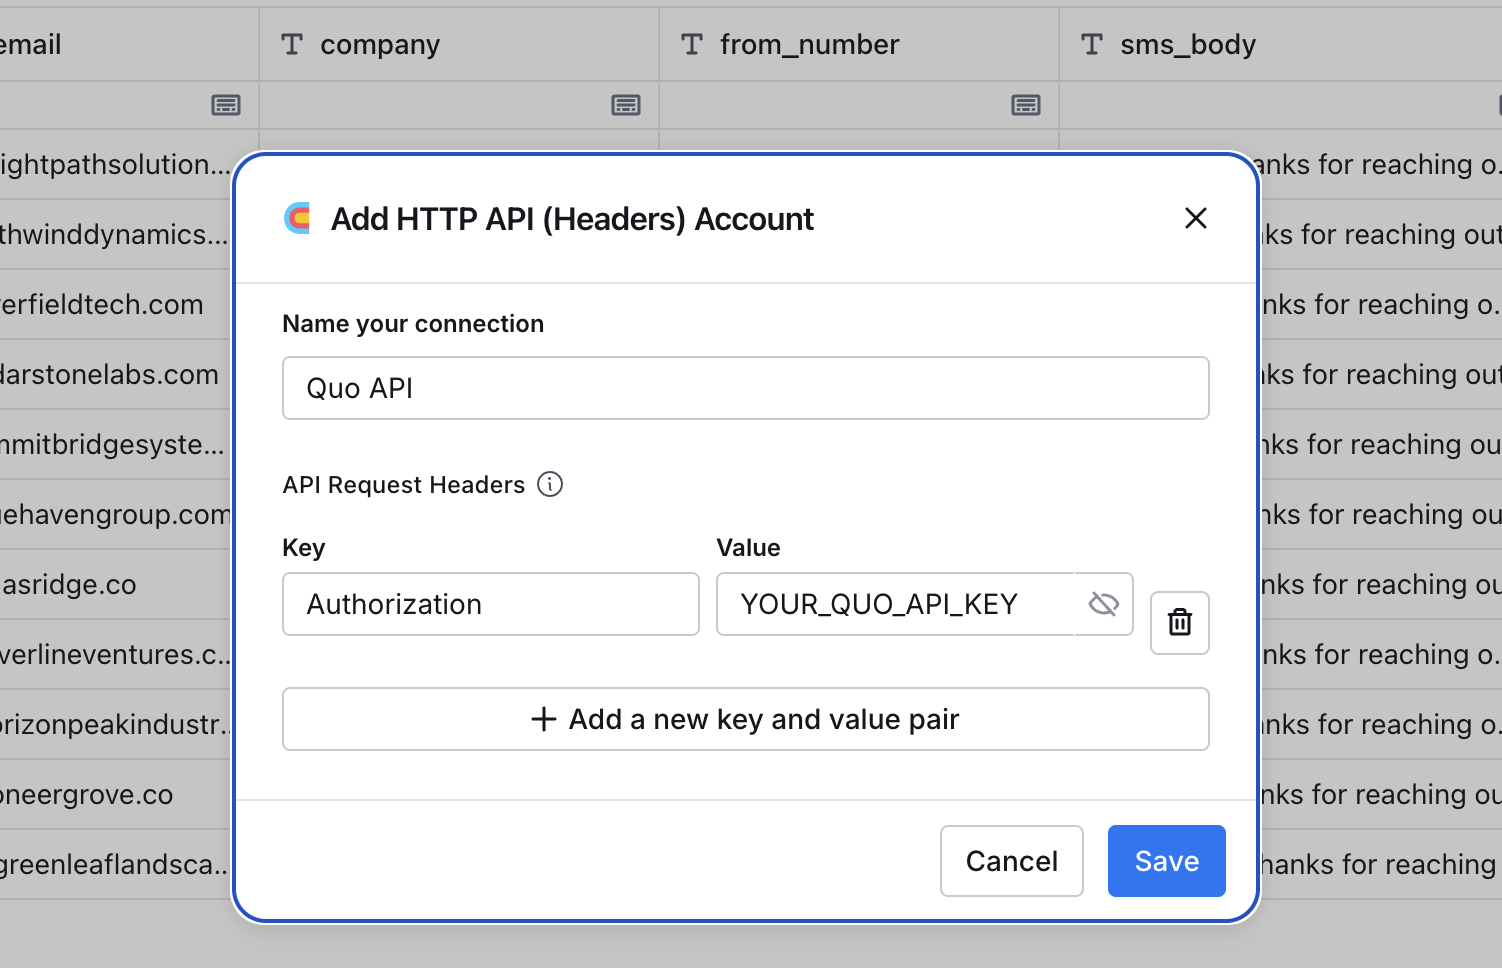
4. Set up the authentication header field and paste in your Quo API key.
 ***
## How to use actions in Clay
### Create contacts in Quo
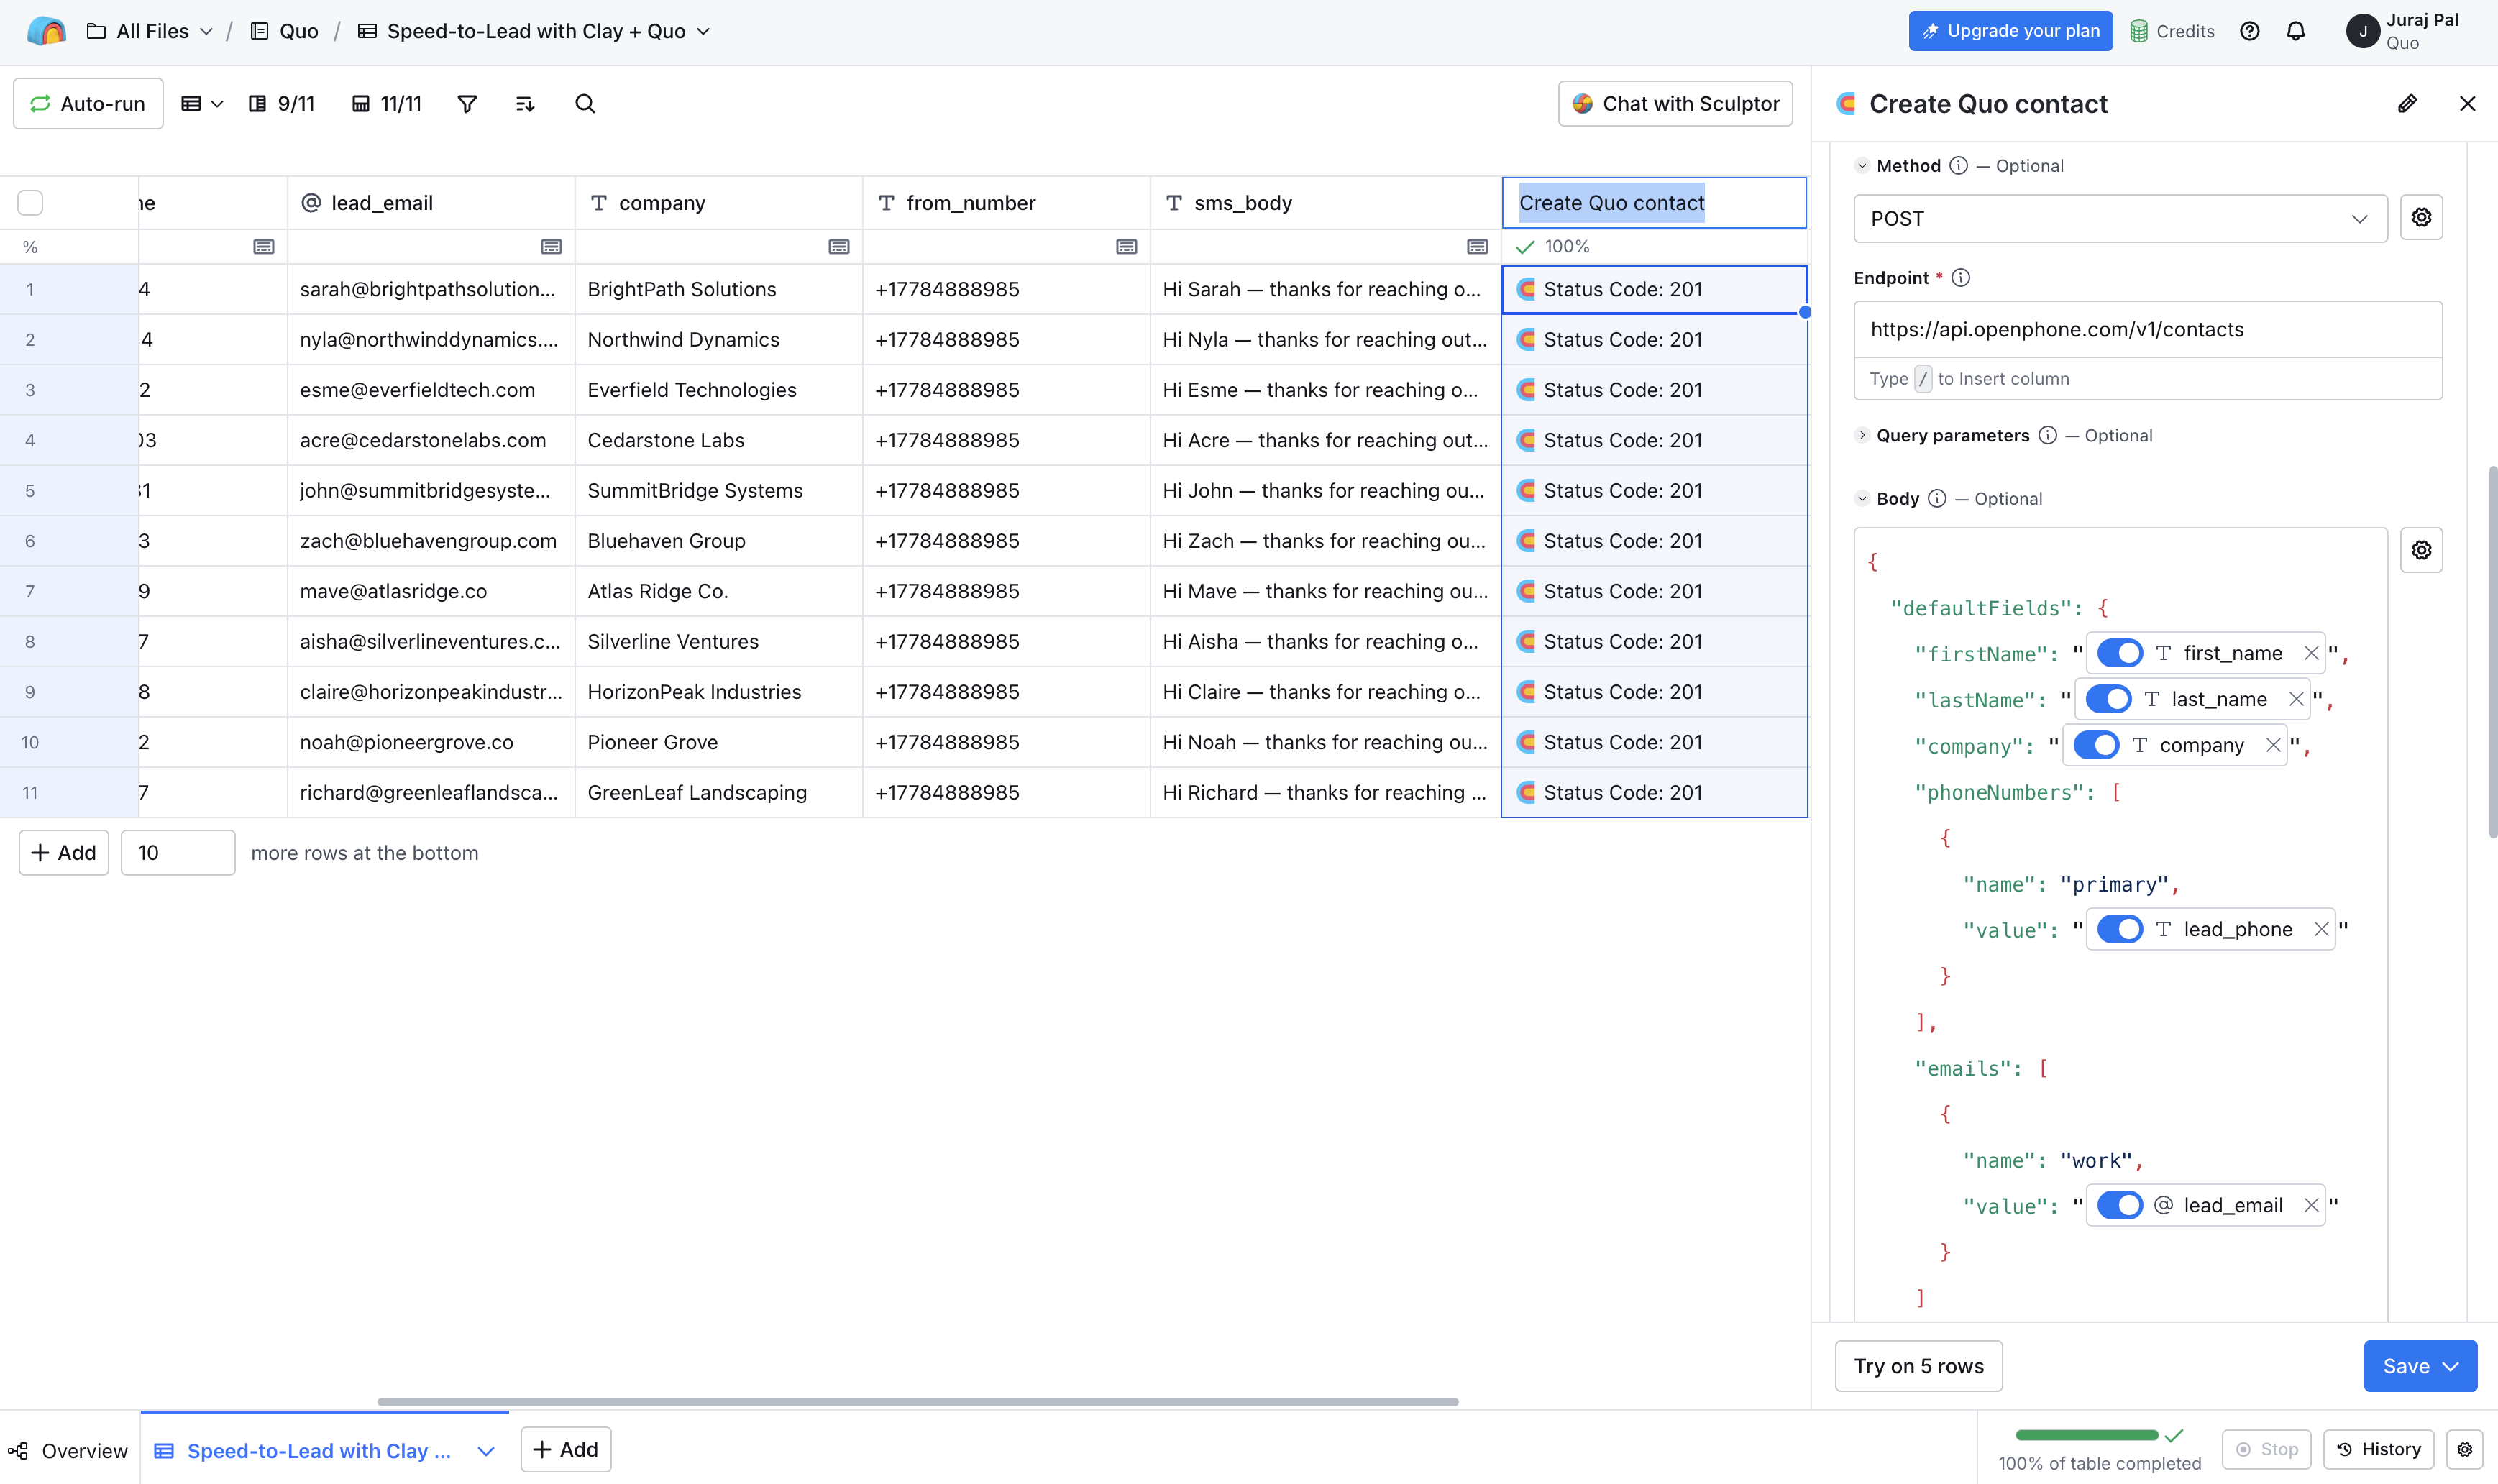
Next, configure an HTTP API enrichment column that creates contacts.
| **Method** | **Endpoint** |
| ---------- | ------------------------------------------------------------------------------ |
| POST | [https://api.openphone.com/v1/contacts](https://api.openphone.com/v1/contacts) |
```text Request body example theme={null}
{
"defaultFields": {
"firstName": "/First Name",
"lastName": "/Last Name",
"company": "/Company",
"phoneNumbers": [
{
"name": "primary",
"value": "/Phone"
}
],
"emails": [
{
"name": "work",
"value": "/Email"
}
]
}
}
```
Clay will replace each column reference with values from the row. When the enrichment runs, a new contact will be created in Quo.
***
## How to use actions in Clay
### Create contacts in Quo
Next, configure an HTTP API enrichment column that creates contacts.
| **Method** | **Endpoint** |
| ---------- | ------------------------------------------------------------------------------ |
| POST | [https://api.openphone.com/v1/contacts](https://api.openphone.com/v1/contacts) |
```text Request body example theme={null}
{
"defaultFields": {
"firstName": "/First Name",
"lastName": "/Last Name",
"company": "/Company",
"phoneNumbers": [
{
"name": "primary",
"value": "/Phone"
}
],
"emails": [
{
"name": "work",
"value": "/Email"
}
]
}
}
```
Clay will replace each column reference with values from the row. When the enrichment runs, a new contact will be created in Quo.
 ### Send SMS messages from Clay
You can also configure an HTTP API enrichment to send SMS messages. Add a second HTTP API enrichment column.
| **Method** | **Endpoint** |
| ---------- | ------------------------------------------------------------------------------ |
| POST | [https://api.openphone.com/v1/messages](https://api.openphone.com/v1/messages) |
```text Request body example theme={null}
{
"content": "/SMS Message",
"from": "/Quo Number",
"to": [
"/Phone"
]
}
```
### Send SMS messages from Clay
You can also configure an HTTP API enrichment to send SMS messages. Add a second HTTP API enrichment column.
| **Method** | **Endpoint** |
| ---------- | ------------------------------------------------------------------------------ |
| POST | [https://api.openphone.com/v1/messages](https://api.openphone.com/v1/messages) |
```text Request body example theme={null}
{
"content": "/SMS Message",
"from": "/Quo Number",
"to": [
"/Phone"
]
}
```
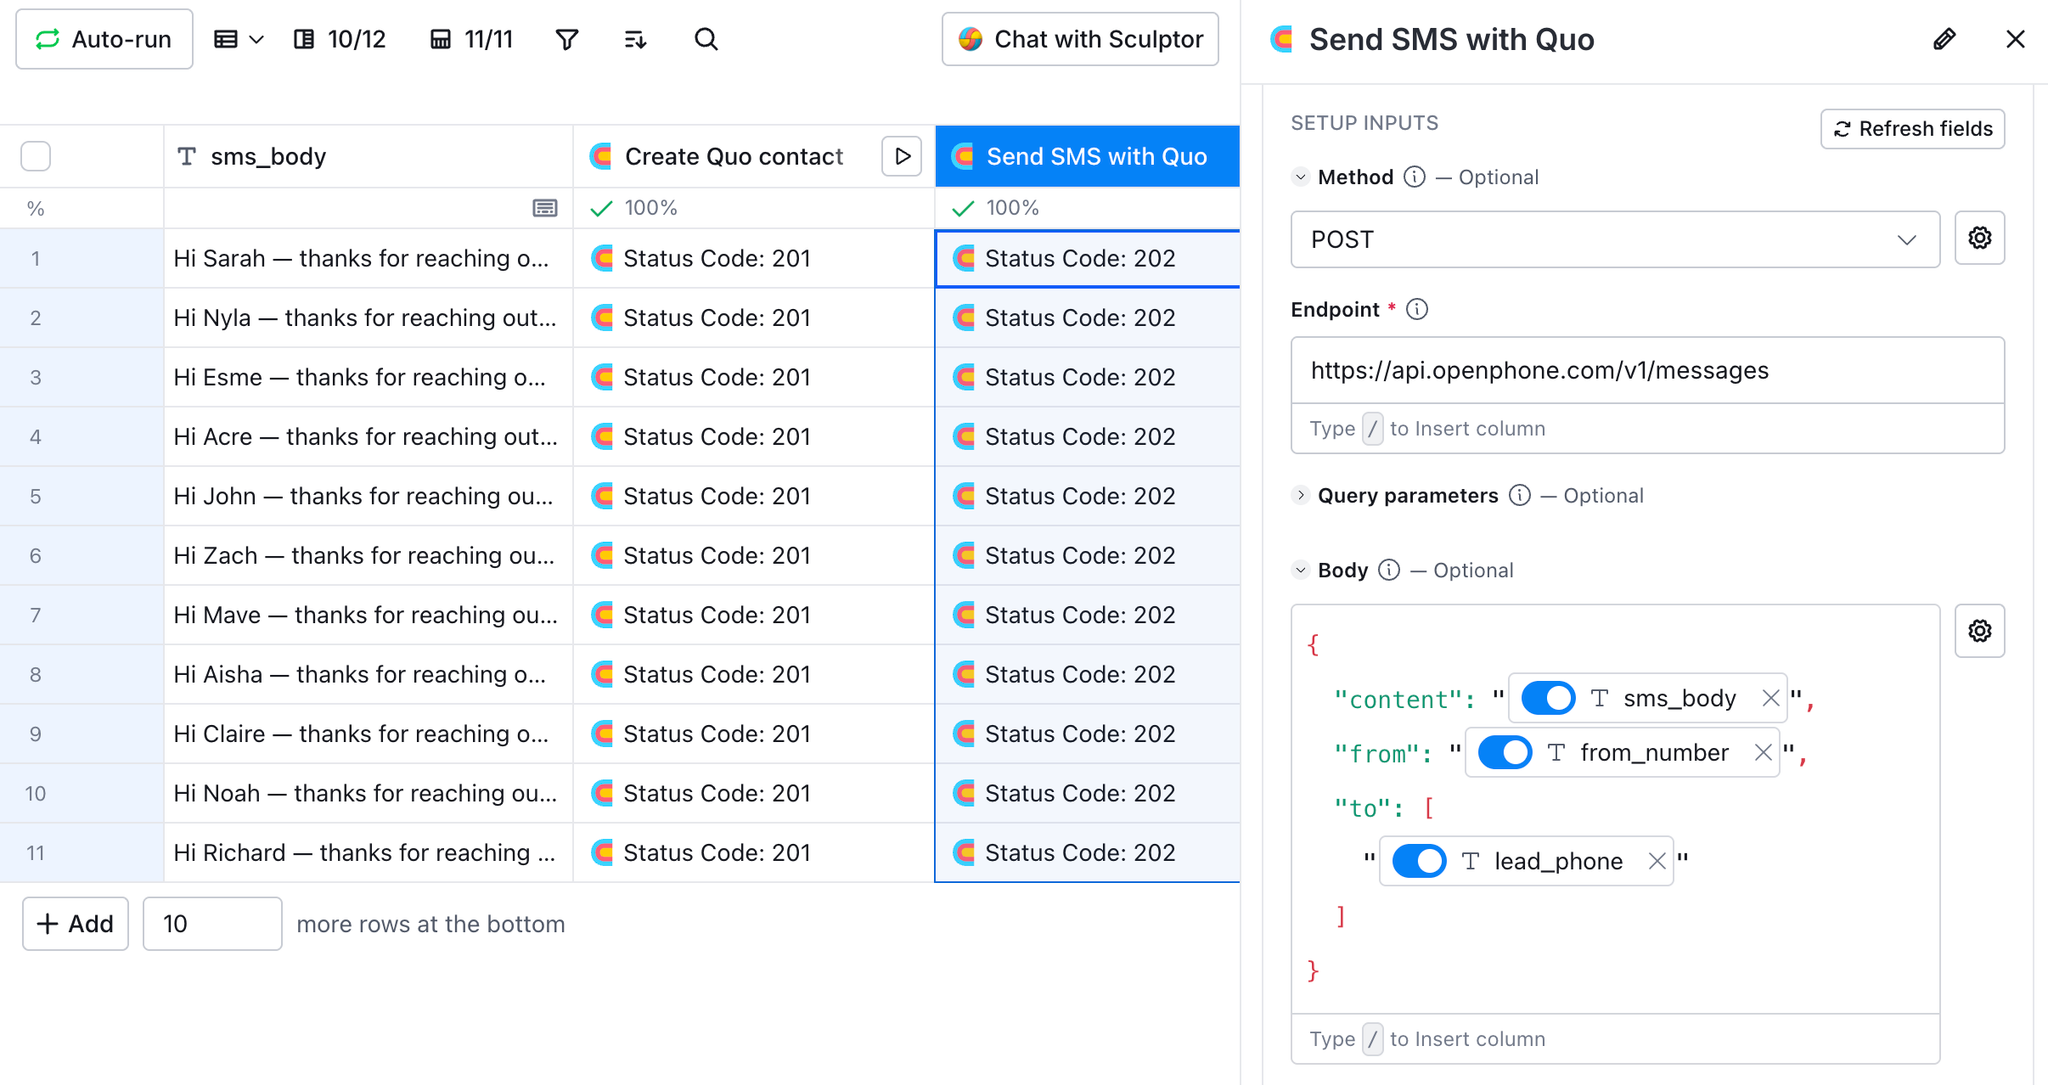 Once configured, **click Run** on your row (or auto-run on new rows).
For detailed API configuration instructions, refer to our [API Integrations article](https://support.quo.com/core-concepts/integrations/api).
***
## Need Support?
Submit a support request at [**support.quo.com**](http://support.quo.com/) for help with the Clay integration setup.
Once configured, **click Run** on your row (or auto-run on new rows).
For detailed API configuration instructions, refer to our [API Integrations article](https://support.quo.com/core-concepts/integrations/api).
***
## Need Support?
Submit a support request at [**support.quo.com**](http://support.quo.com/) for help with the Clay integration setup.