> ## Documentation Index
> Fetch the complete documentation index at: https://support.quo.com/llms.txt
> Use this file to discover all available pages before exploring further.
# Team members and roles
> Add team members, assign roles, and manage permissions to collaborate effectively in your workspace
## Overview
Team members and roles help you collaborate effectively while maintaining security. Control who can access your workspace, what they can do, and how they work together through customizable roles and permissions.
## Understanding roles and permissions
### Three workspace roles
Quo, formerly OpenPhone, offers three default roles, each designed for different team responsibilities:
**Owner role**
* Full administrative control over the workspace
* Can manage billing and subscription settings
* Assign or change roles for any team member
* Add or remove other owners
* Complete access to all features
**Admin role**
* Manage team members and phone numbers
* Configure workspace features and integrations
* Cannot add/remove owners
* Otherwise full administrative access
**Member role**
* Use assigned phone numbers for calls and texts
* Manage contacts and personal settings
* Collaborate on shared inboxes
* Limited administrative access
* Cannot modify workspace settings
All roles can invite new team members, but **only Owners and Admins can remove members or modify roles**. Users invited by Members are automatically assigned the Member role.
### Detailed permissions breakdown
| Permission | Owner | Admin | Member |
| ----------------------------------------- | ----- | ----- | ------ |
| Send texts, make calls, message teammates | ✓ | ✓ | ✓ |
| Manage contacts | ✓ | ✓ | ✓ |
| Bulk import contacts (Google/CSV) | ✓ | ✓ | ✓ |
| Invite team members | ✓ | ✓ | ✓ |
| Remove team members | ✓ | ✓ | |
| Update member roles | ✓ | ✓ | |
| Manage billing | ✓ | ✓ | |
| Update phone number settings | ✓ | ✓ | |
| Add new phone numbers | ✓ | ✓ | |
| Create workspace groups | ✓ | ✓ | |
| Configure integrations | ✓ | ✓ | |
| Submit/manage port requests | ✓ | ✓ | |
| Add/remove other owners | ✓ | | |
### Phone number ownership
Beyond workspace roles, individual phone numbers can have owners:
* Number owners control who can access that specific number
* Only number owners, workspace owners, or admins can update number settings
* Settings include: inbox name, caller ID, business hours, call flows
## Adding team members
### Method 1: Direct invitation
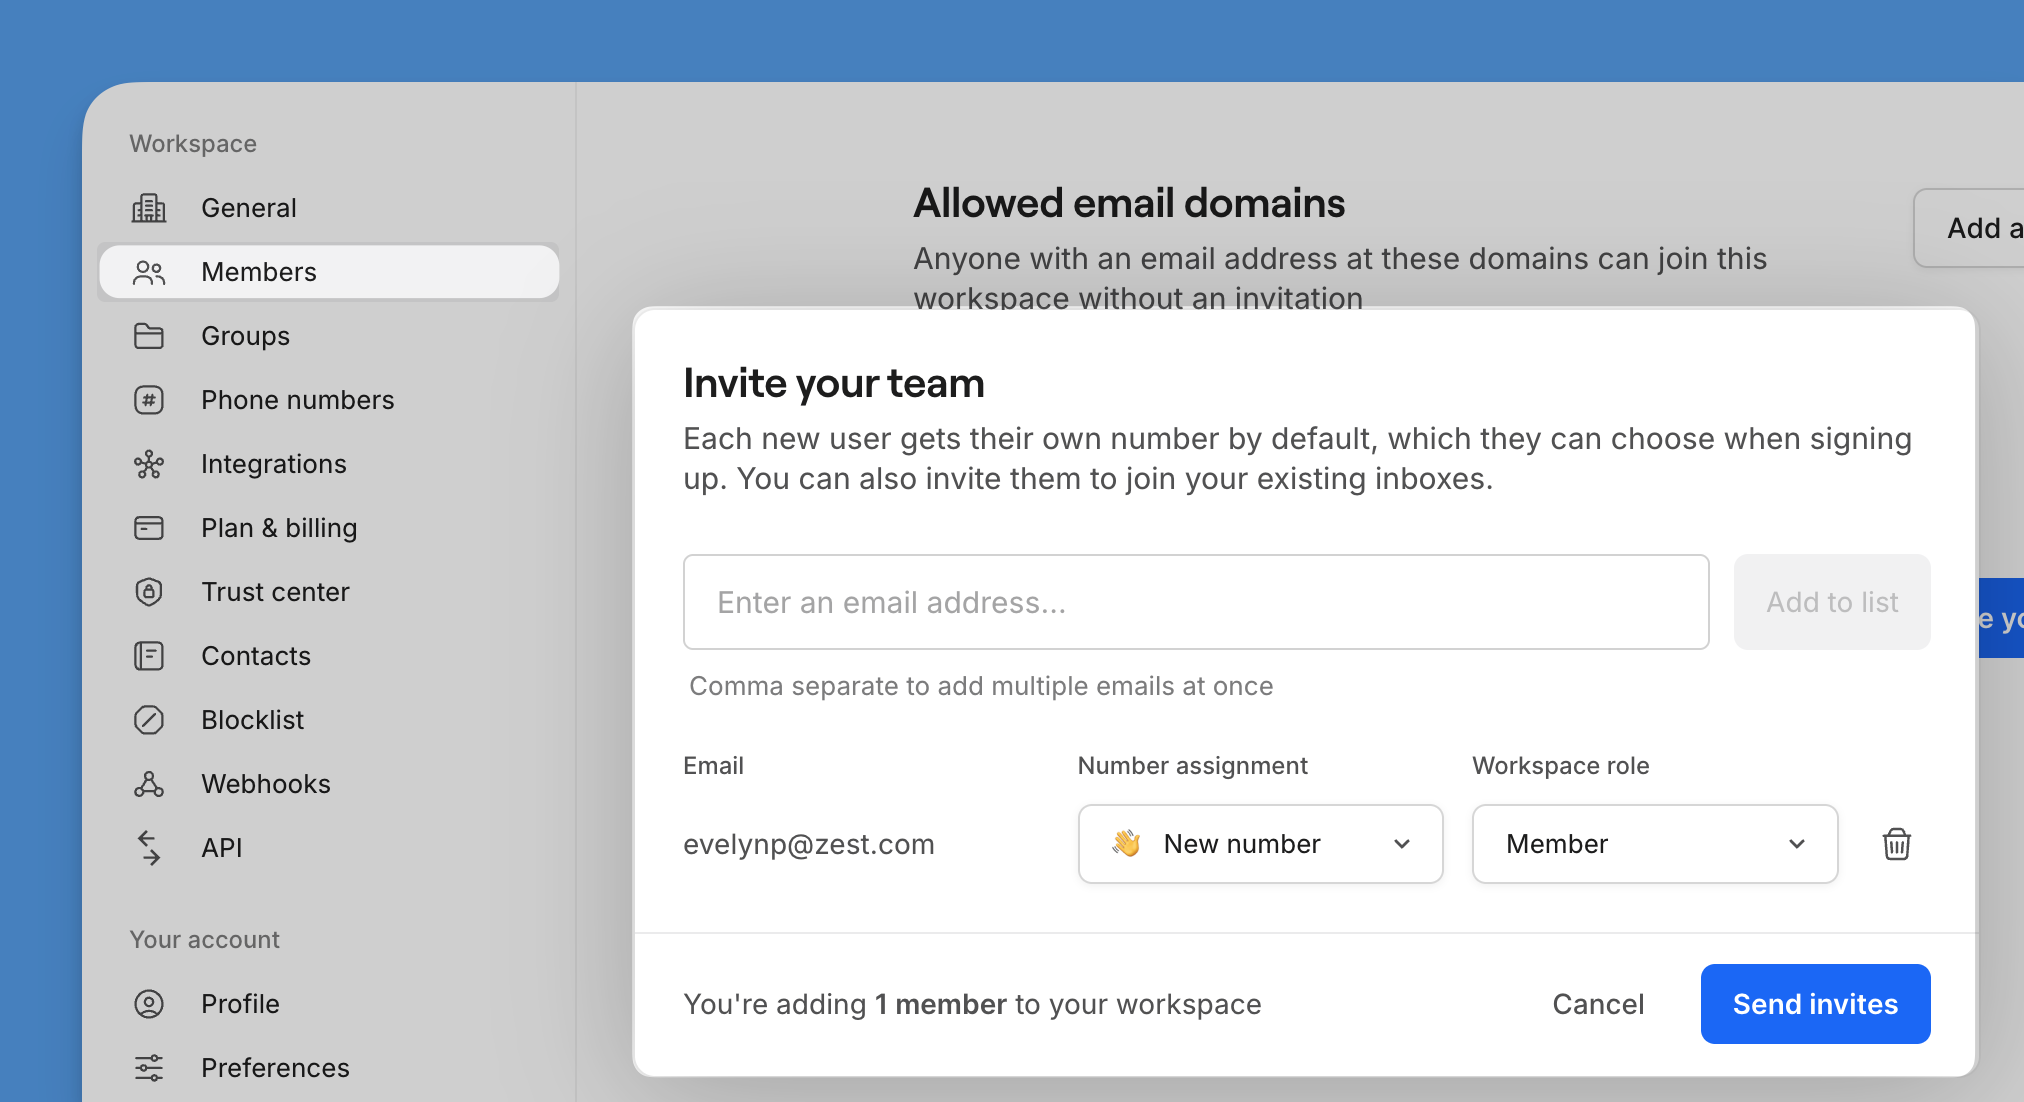 1. Navigate to **Settings** → **Members**
2. Click **Invite your team** or **Invite a member**
3. Enter email addresses (comma-separated for multiple)
4. Choose initial phone assignment:
* **Assign a new number**: They'll select during onboarding
* **Share existing**: Grant access to current numbers
5. Select their role (Owner, Admin, or Member)
6. Click **Send invitations**
Use work email addresses for invitations. This helps with domain claiming and ensures professional communication.
### Method 2: Claim your domain
Streamline onboarding by claiming your company's email domain:
1. Navigate to **Settings** → **Members**
2. Click **Invite your team** or **Invite a member**
3. Enter email addresses (comma-separated for multiple)
4. Choose initial phone assignment:
* **Assign a new number**: They'll select during onboarding
* **Share existing**: Grant access to current numbers
5. Select their role (Owner, Admin, or Member)
6. Click **Send invitations**
Use work email addresses for invitations. This helps with domain claiming and ensures professional communication.
### Method 2: Claim your domain
Streamline onboarding by claiming your company's email domain:
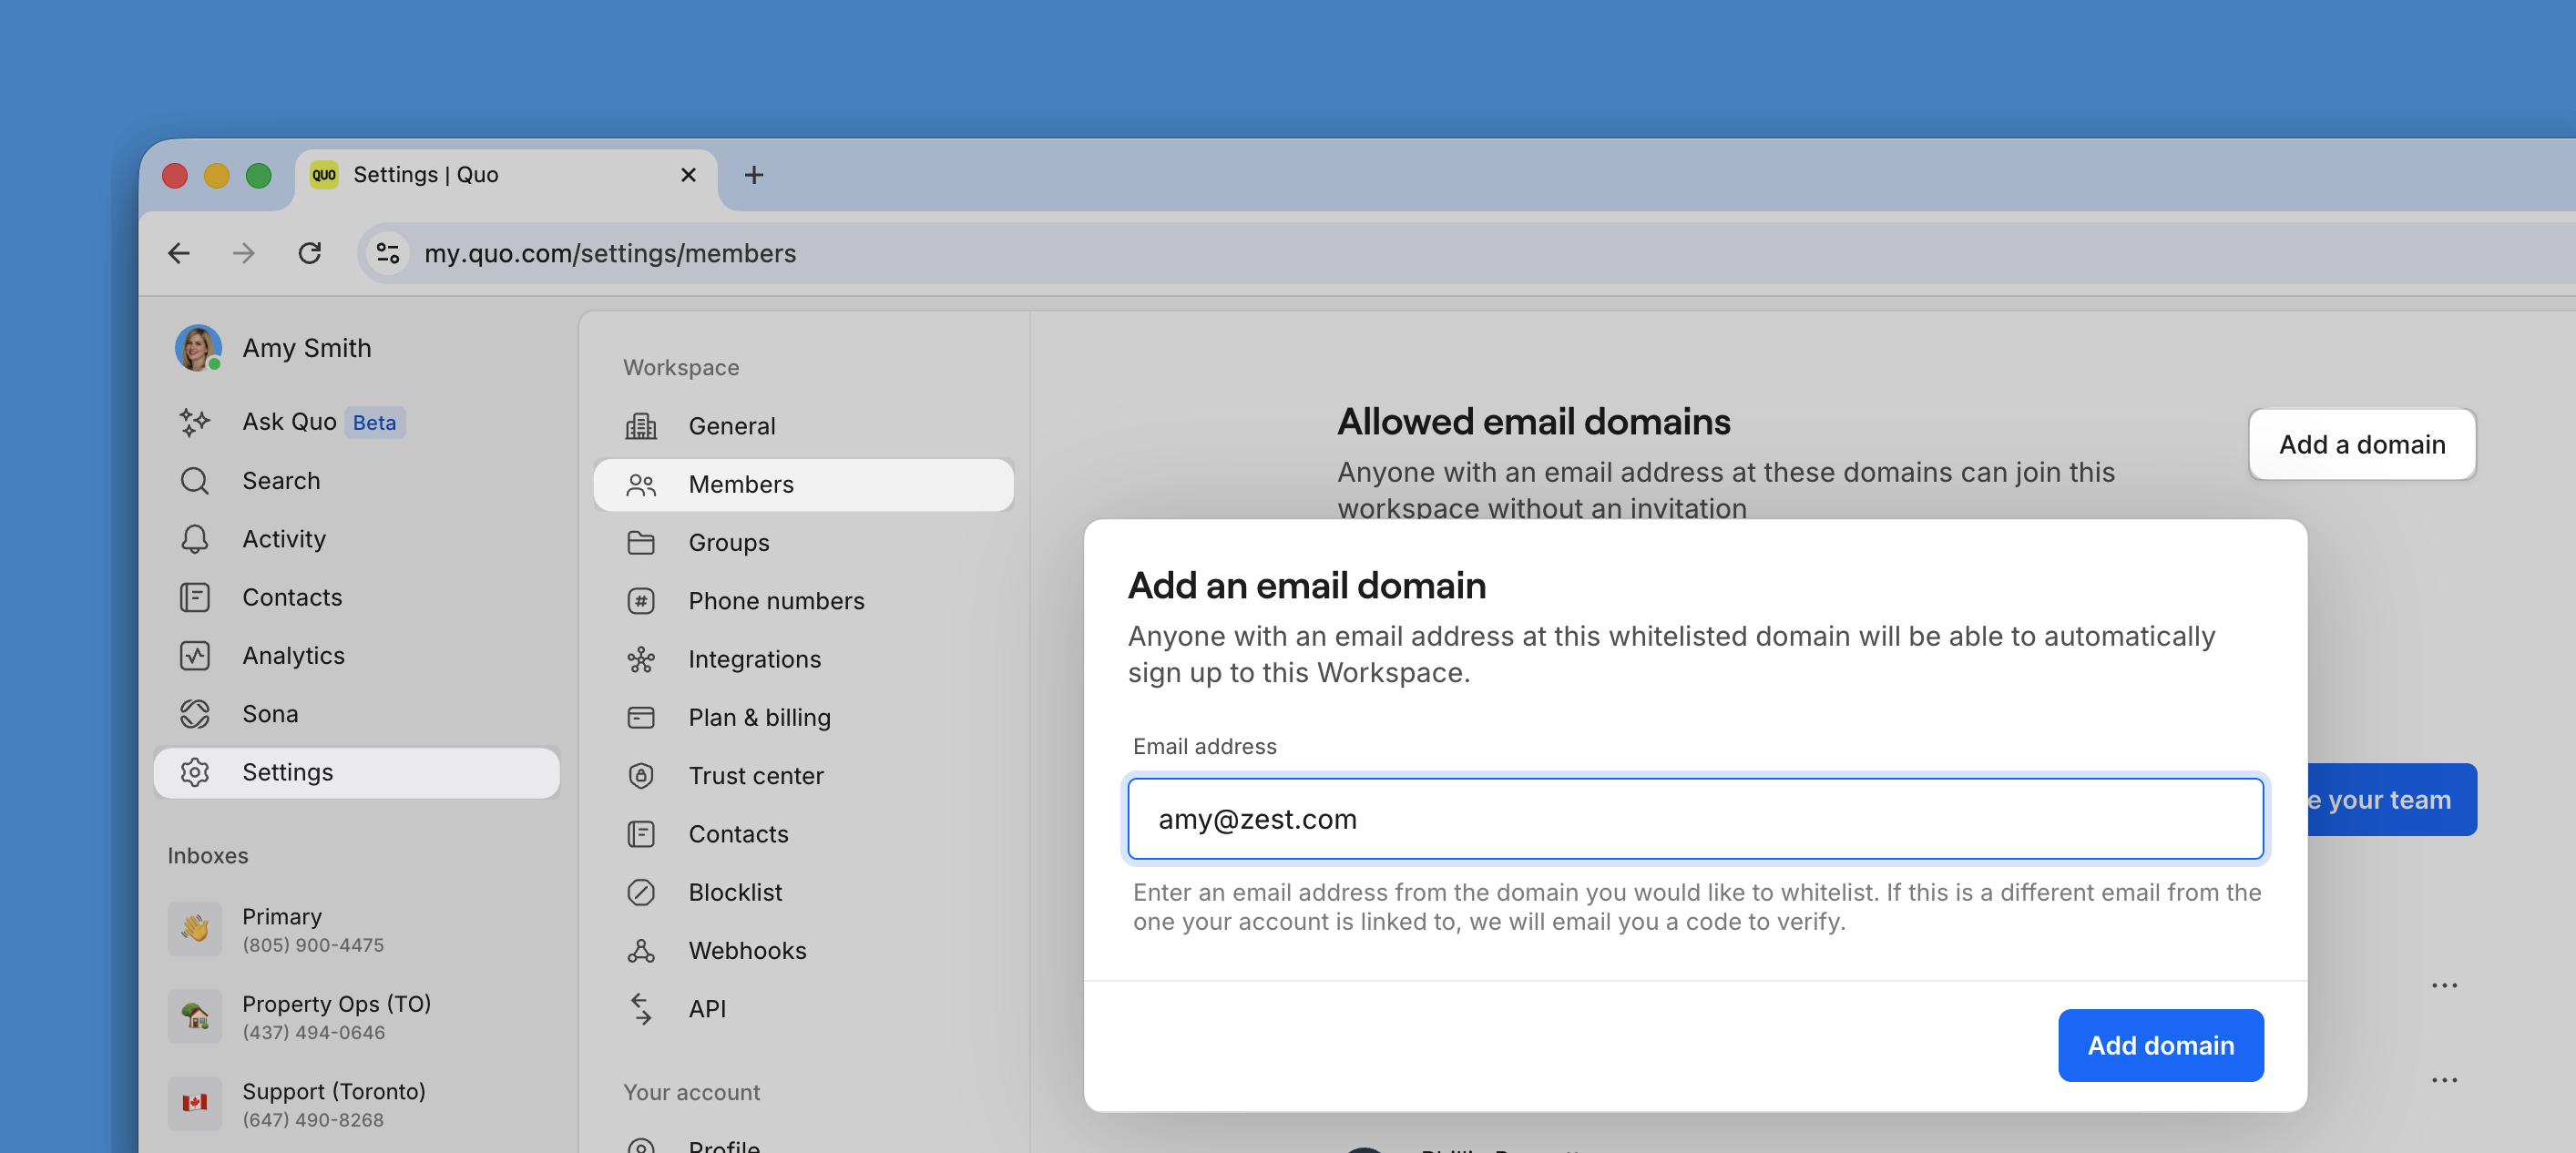 1. Go to **Settings** → **Members**
2. Click **Claim your domain**
3. Enter an email address with your company domain
4. Verify domain ownership
Once claimed:
* Anyone with your company email can join automatically
* They sign up normally and see "Join existing workspace"
* No invitation needed
* Default role is Member (can be changed later)
1. Go to **Settings** → **Members**
2. Click **Claim your domain**
3. Enter an email address with your company domain
4. Verify domain ownership
Once claimed:
* Anyone with your company email can join automatically
* They sign up normally and see "Join existing workspace"
* No invitation needed
* Default role is Member (can be changed later)
 **Only Owners and Admins can claim email domains.** Ensure you trust all employees with company email addresses before enabling this feature.
## The invitation process
**What invitees receive**
1. **Email invitation** with workspace details
2. **Accept invitation** link
3. Guided onboarding:
* Account creation
* Phone number selection
* App download instructions
4. Immediate access to assigned resources
**What happens next**
New members can:
* Start calling and texting immediately
* Access shared phone numbers
* View conversation history
* Collaborate with teammates
## Managing existing members
**View team roster**
1. Go to **Settings** → **Members**
2. See all members with:
* Name and email
* Current role
* Phone numbers assigned
* Last active status
**Update member permissions**
To modify an existing member's role:
1. Click the three dots (...) next to their name
2. Select **Change role**
3. Choose new role
4. Confirm change
**Role changes take effect immediately.** Members may need to refresh their app to see updated permissions.
**Remove team members**
**Only Owners and Admins can claim email domains.** Ensure you trust all employees with company email addresses before enabling this feature.
## The invitation process
**What invitees receive**
1. **Email invitation** with workspace details
2. **Accept invitation** link
3. Guided onboarding:
* Account creation
* Phone number selection
* App download instructions
4. Immediate access to assigned resources
**What happens next**
New members can:
* Start calling and texting immediately
* Access shared phone numbers
* View conversation history
* Collaborate with teammates
## Managing existing members
**View team roster**
1. Go to **Settings** → **Members**
2. See all members with:
* Name and email
* Current role
* Phone numbers assigned
* Last active status
**Update member permissions**
To modify an existing member's role:
1. Click the three dots (...) next to their name
2. Select **Change role**
3. Choose new role
4. Confirm change
**Role changes take effect immediately.** Members may need to refresh their app to see updated permissions.
**Remove team members**
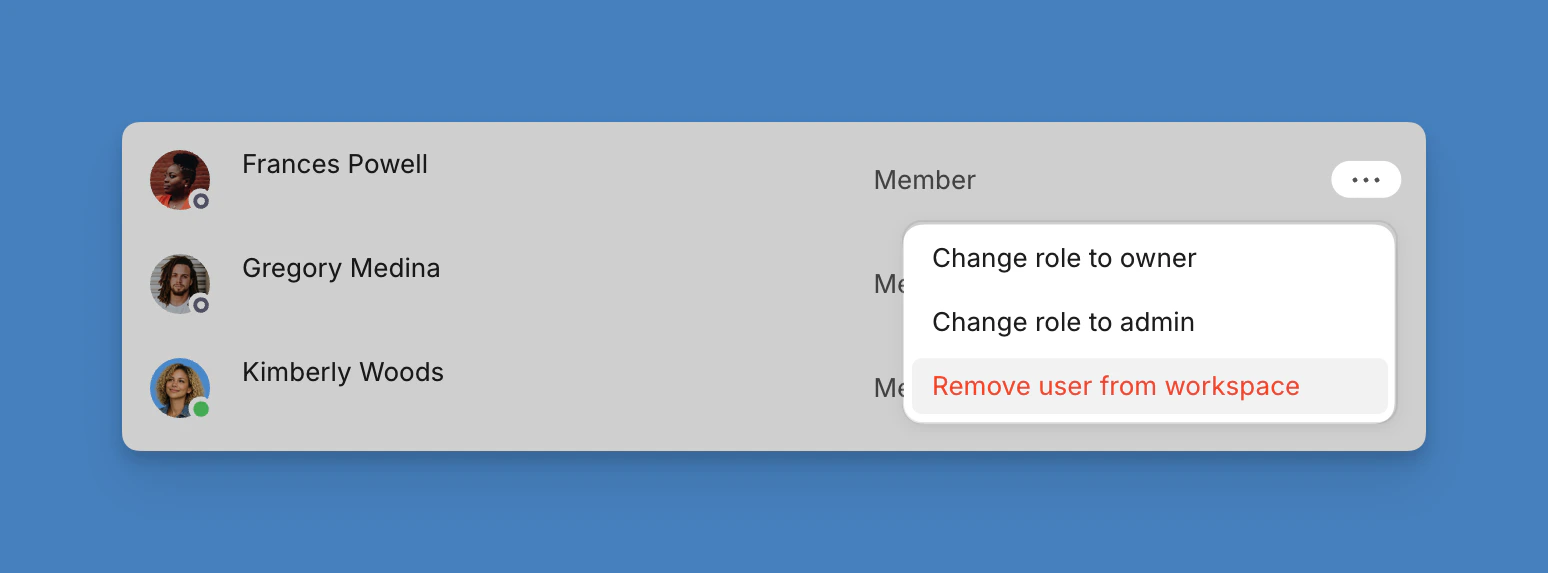 When someone leaves your organization:
1. Navigate to **Settings** → **Members**
2. Click three dots (...) next to their name
3. Select **Remove user from workspace**
4. Reassign their phone numbers if needed
5. Confirm removal
Removing members can only be done via **web or desktop app**, not mobile.
## Phone number management
### Assigning numbers to members
Give team members access to phone numbers:
1. During invitation process
2. From phone number settings
3. Through member management page
### Managing shared numbers
For numbers used by multiple team members:
* Set ring order for incoming calls
* Configure individual notifications
* Track activity with conversation attribution
* Maintain unified inbox view
## How it impacts billing
**Adding members**
* Prorated charges apply immediately
* Billed for the remainder of the current period
* Each member requires a subscription
* First number included, additional numbers \$5/month
**Removing members**
* The seat stays on your subscription through the end of the current billing period
* Add a new member to that seat anytime before renewal at no extra cost
* If the seat is still empty at renewal, we remove it from your subscription automatically — no manual downgrade required
* Need a seat back later? You can add one at any time
**Pricing structure**
* 3 plans to choose from: **Starter, Business** or **Scale**
* Each plan includes one number
* No limit on team size
* [View detailed pricing information here](https://www.quo.com/pricing)
## Collaboration features
### For shared numbers
* See who's handling conversations
* Leave internal comments
* Transfer conversations between members
* Set team availability schedules
### Communication tools
* Direct message teammates
* Mention colleagues in threads
* Share contact information
* Collaborate on customer issues
### Visibility features
* Activity tracking per member
* Call and text analytics
* Performance insights
* Workload distribution
## Keep your account secure
**Access control**
* Use principle of least privilege, meaning that people should only really have access to things they will regulrly need
* Regularly audit member access to make sure no one has access to something they shouldn't
* Remove inactive members promptly so that you don't forget (though regular audits help here)
* Document role assignments somewhere that you and others can see them
**For sensitive operations**
* Limit owner accounts to a minimum number of people
* Restrict admin access to one or two people
* Use shared numbers carefully
* Monitor permission changes to make sure a change isn't made without your knowledge
## Troubleshooting
### Invitation issues
**Member didn't receive invitation**
* Check spam/junk folders
* Verify email address
* Resend invitation
* Try alternate email
**Can't join workspace**
* Ensure using invited email
* Check if domain is claimed
* Verify workspace still active
* Contact workspace admin
### Permission problems
**Member can't access features**
* Verify correct role assigned
* Check phone number permissions
* Refresh app/browser
* Review workspace settings
**Unexpected access levels**
* Audit current permissions
* Check for recent changes
* Verify number ownership
* Contact support if needed
## FAQs
By default, members can only see their own activity. To view others' calls, they need access to shared inboxes or specific phone numbers.
We recommend 2-3 admins for most organizations. This ensures coverage while maintaining security. Larger teams may need more.
Their access is revoked immediately and they're logged out. Phone numbers and conversation history stay in your workspace so you can reassign them.
The seat itself stays on your subscription until the end of your current billing period. You can fill it with another member at no extra cost, or leave it empty — we'll automatically remove the seat at your next renewal so your bill goes down the following period.
Currently, Quo offers three predefined roles. For specific permission needs, combine roles with phone number access controls.
Only the current Owner can transfer ownership. Go to Settings → Members, click on your name, and select "Transfer ownership" to assign to another member.
Yes, all roles can send invitations. However, only Owners and Admins can remove members or change roles after they join. Anyone invited by a Member is automatically assigned the Member role.
Workspace roles control overall permissions. Number roles determine access to specific phone numbers. A Member with number ownership has full control of that number.
You're billed per user, not per number access. Multiple members can share a number without additional charges beyond their individual subscriptions.
***
**Need help?** [Submit a support request](https://support.quo.com/help/submit-a-request) and we'll jump in.
When someone leaves your organization:
1. Navigate to **Settings** → **Members**
2. Click three dots (...) next to their name
3. Select **Remove user from workspace**
4. Reassign their phone numbers if needed
5. Confirm removal
Removing members can only be done via **web or desktop app**, not mobile.
## Phone number management
### Assigning numbers to members
Give team members access to phone numbers:
1. During invitation process
2. From phone number settings
3. Through member management page
### Managing shared numbers
For numbers used by multiple team members:
* Set ring order for incoming calls
* Configure individual notifications
* Track activity with conversation attribution
* Maintain unified inbox view
## How it impacts billing
**Adding members**
* Prorated charges apply immediately
* Billed for the remainder of the current period
* Each member requires a subscription
* First number included, additional numbers \$5/month
**Removing members**
* The seat stays on your subscription through the end of the current billing period
* Add a new member to that seat anytime before renewal at no extra cost
* If the seat is still empty at renewal, we remove it from your subscription automatically — no manual downgrade required
* Need a seat back later? You can add one at any time
**Pricing structure**
* 3 plans to choose from: **Starter, Business** or **Scale**
* Each plan includes one number
* No limit on team size
* [View detailed pricing information here](https://www.quo.com/pricing)
## Collaboration features
### For shared numbers
* See who's handling conversations
* Leave internal comments
* Transfer conversations between members
* Set team availability schedules
### Communication tools
* Direct message teammates
* Mention colleagues in threads
* Share contact information
* Collaborate on customer issues
### Visibility features
* Activity tracking per member
* Call and text analytics
* Performance insights
* Workload distribution
## Keep your account secure
**Access control**
* Use principle of least privilege, meaning that people should only really have access to things they will regulrly need
* Regularly audit member access to make sure no one has access to something they shouldn't
* Remove inactive members promptly so that you don't forget (though regular audits help here)
* Document role assignments somewhere that you and others can see them
**For sensitive operations**
* Limit owner accounts to a minimum number of people
* Restrict admin access to one or two people
* Use shared numbers carefully
* Monitor permission changes to make sure a change isn't made without your knowledge
## Troubleshooting
### Invitation issues
**Member didn't receive invitation**
* Check spam/junk folders
* Verify email address
* Resend invitation
* Try alternate email
**Can't join workspace**
* Ensure using invited email
* Check if domain is claimed
* Verify workspace still active
* Contact workspace admin
### Permission problems
**Member can't access features**
* Verify correct role assigned
* Check phone number permissions
* Refresh app/browser
* Review workspace settings
**Unexpected access levels**
* Audit current permissions
* Check for recent changes
* Verify number ownership
* Contact support if needed
## FAQs
By default, members can only see their own activity. To view others' calls, they need access to shared inboxes or specific phone numbers.
We recommend 2-3 admins for most organizations. This ensures coverage while maintaining security. Larger teams may need more.
Their access is revoked immediately and they're logged out. Phone numbers and conversation history stay in your workspace so you can reassign them.
The seat itself stays on your subscription until the end of your current billing period. You can fill it with another member at no extra cost, or leave it empty — we'll automatically remove the seat at your next renewal so your bill goes down the following period.
Currently, Quo offers three predefined roles. For specific permission needs, combine roles with phone number access controls.
Only the current Owner can transfer ownership. Go to Settings → Members, click on your name, and select "Transfer ownership" to assign to another member.
Yes, all roles can send invitations. However, only Owners and Admins can remove members or change roles after they join. Anyone invited by a Member is automatically assigned the Member role.
Workspace roles control overall permissions. Number roles determine access to specific phone numbers. A Member with number ownership has full control of that number.
You're billed per user, not per number access. Multiple members can share a number without additional charges beyond their individual subscriptions.
***
**Need help?** [Submit a support request](https://support.quo.com/help/submit-a-request) and we'll jump in.